Saturday, September 3, 2022
Wednesday, May 6, 2020
Install Android Studio in Windows 10 Step-By-Step
How to install Android Studio in Windows 10?
Windows requirements:
- Microsoft Windows 7/8/10 (32-bit or 64-bit)
- 3 GB RAM minimum, 8 GB RAM recommended (plus 1 GB for the Android Emulator)
- 2 GB of available disk space minimum, 4 GB recommended (500 MB for IDE plus 1.5 GB for Android SDK and emulator system image)
- 1280 x 800 minimum screen resolution

You can also select Android Distribution package manually by clicking "DOWNLOAD OPTIONS" button.
 |
| Distribution Package List |
I have downloaded directly clicking on "DOWNLOAD ANDROID STUDIO" button.
Read the terms and conditions and accept it by clicking on checkbox. Then download button gets enable.
 |
| Terms & Condition for Downloading Android Studio |
Click on "DOWNLOAD ANDROID STUDIO FOR WINDOWS" button.
Installing Android Studio on 64-bit Windows 10
I launched android-studio-ide-192.6392135-windows.exe to start the installation process. The installer responded by presenting the Android Studio Setup dialog box shown in Figure 1.
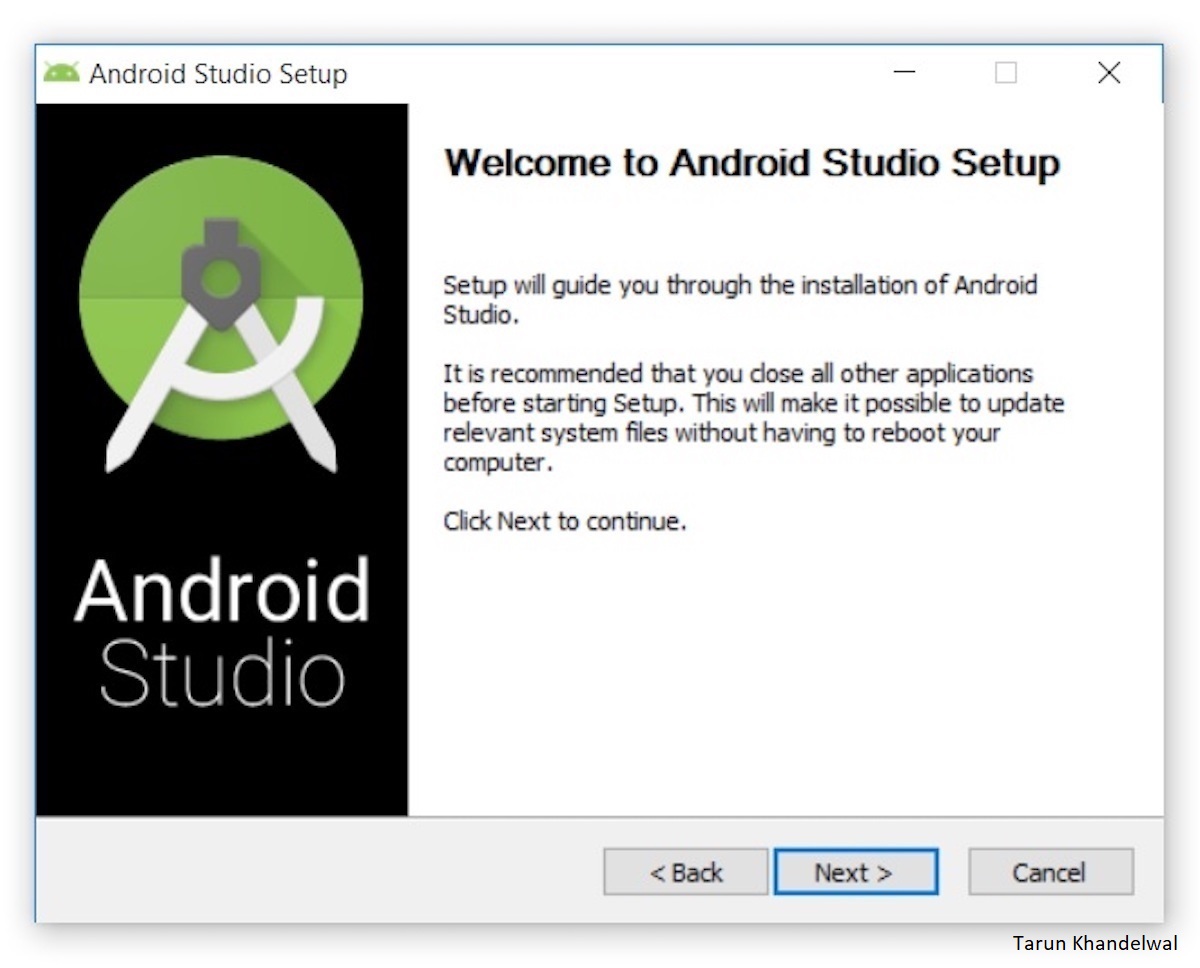 |
| Figure 1. Set up Android Studio |
Click Next, following panel will appear, which provides option to decline installation of Android Virtual Device (AVD).
 |
| Figure 2. Install an Android AVD? |
I chose to keep the default settings. After clicking Next, the Configuration Settings panel appears, which asks where to install Android Studio.
 | |
|
I kept default installation location, and clicked Next and panel asks for creating shortcut on Start Menu.
 |
| Figure 4. Choose Start Menu Folder |
I kept default settings and clicked on Install. The following installing panel appears.
Clicking on Show Details causes the names of files being installed and another activities to be displayed.
 | |
|
When installation finished, the Installation Complete panel appears.
 |
| Figure 6. Install Complete Panel |
After clicking Next, the installer presents the Completing Android Studio Setup panel.
 | |
|
To complete the installation, I left the Start Android Studio checkbox checked, and click on Finish.
Click to check: How to configure Android Studio after installation
Wednesday, April 29, 2020
How to create Spring Boot project in Spring-tool-Suite (STS) Step-By-Step
Create Spring Boot project in Spring-tool-Suite (STS)
There are two ways to create Spring Boot project either by using https://start.spring.io or IDE. So, Let's begin.- Create Spring Boot project using spring tool suite or you can use https://start.spring.io:
- Provide necessary details in https://start.spring.io or IDE such as name, type, Packaging, Java Version, Language, etc. For example:

Details for creating project using STS

Add Dependencies in start.spring.io and generate project - Select Spring Boot Version, and select the dependencies required for your project. I am taking the following dependency in my project:
- Rest Repository - Exposing Spring Data repositories over REST via Spring Data REST.
- Spring Data JPA - Persist data in SQL stores with Java Persistence API using Spring Data and Hibernate.
- MySQL Driver - MySQL JDBC driver.
- Spring Boot DevTools - Provides fast application restarts, LiveReload, and configurations for enhanced development experience.
- Spring Web Starter - Build web, including RESTful, applications using Spring MVC.
- Click on finish in IDE. If you are creating project start.spring.io then, generate the project as zip, extract it and import in IDE.
- After successful create/import project, structure will look like:
Enjoy learning. :)
Structure after project creation
 |
| Create New Spring Boot project using Spring Tool Suite |


Tuesday, April 28, 2020
How can I view the digital license of Windows 10 on PC?
Follow below steps to get digital license of Windows 10:
1. Navigate to start button.
2. Search for settings
3. Open Updates and Security

4. Click on Activation

Steps for finding the product key for the windows 10 PC which is activated with a digital license :
- Press Windows key + X
- Click Command Prompt (admin)
- Enter the following command:
wmic path SoftwareLicensingService get OA3xOriginalProductKey
4. Hit Enter
You’ll get the respective license key after the last step :)
Enjoy.
Wednesday, July 3, 2019
Git Commands
Getting & Creating
Projects
Command
Description
git init
Initialize a local
Git repository
git clone
ssh://git@github.com/[username]/[repository-name].git
Create a local copy
of a remote repository
Basic Snapshot
Command
Description
git status
Check status
git add [file-name.txt]
Add a file to the
staging area
git add -A
Add all new and
changed files to the staging area
git commit -m "[commit message]"
Commit changes
git rm -r [file-name.txt]
Remove a file (or
folder)
Branching &
Merging
Command
Description
git branch
List branches (the
asterisk denotes the current branch)
git branch -a
List all branches
(local and remote)
git branch [branch name]
Create a new branch
git branch -d [branch name]
Delete a branch
git push origin --delete [branch name]
Delete a remote
branch
git checkout -b [branch name]
Create a new branch
and switch to it
git checkout -b [branch name] origin/[branch name]
Clone a remote
branch and switch to it
git checkout [branch name]
Switch to a branch
git checkout -
Switch to the branch
last checked out
git checkout -- [file-name.txt]
Discard changes to a
file
git merge [branch name]
Merge a branch into
the active branch
git merge [source branch] [target branch]
Merge a branch into
a target branch
git stash
Stash changes in a
dirty working directory
git stash clear
Remove all stashed
entries
Sharing & Updating
Projects
Command
Description
git push origin [branch name]
Push a branch to
your
git push -u origin [branch name]
Push changes to
remote repository
git push
Push changes to
remote repository
git push origin --delete [branch name]
Delete a remote
branch
git pull
Update local
repository to the newest commit
git pull origin [branch name]
Pull changes from
remote repository
git remote add origin
ssh://git@github.com/[username]/[repository-name].git
Add a remote
repository
git remote set-url origin ssh://git@github.com/[username]/[repository-name].git
Set a repository's
origin branch to SSH
Inspection &
Comparison
Command
Description
git log
View changes
git log --summary
View changes
(detailed)
git diff [source branch] [target branch]
Preview changes
before merging
In case of any query you can comment below.
Getting & Creating
Projects
Command
|
Description
|
git init
|
Initialize a local
Git repository
|
git clone
ssh://git@github.com/[username]/[repository-name].git
|
Create a local copy
of a remote repository
|
Basic Snapshot
Command
|
Description
|
git status
|
Check status
|
git add [file-name.txt]
|
Add a file to the
staging area
|
git add -A
|
Add all new and
changed files to the staging area
|
git commit -m "[commit message]"
|
Commit changes
|
git rm -r [file-name.txt]
|
Remove a file (or
folder)
|
Branching &
Merging
Command
|
Description
|
git branch
|
List branches (the
asterisk denotes the current branch)
|
git branch -a
|
List all branches
(local and remote)
|
git branch [branch name]
|
Create a new branch
|
git branch -d [branch name]
|
Delete a branch
|
git push origin --delete [branch name]
|
Delete a remote
branch
|
git checkout -b [branch name]
|
Create a new branch
and switch to it
|
git checkout -b [branch name] origin/[branch name]
|
Clone a remote
branch and switch to it
|
git checkout [branch name]
|
Switch to a branch
|
git checkout -
|
Switch to the branch
last checked out
|
git checkout -- [file-name.txt]
|
Discard changes to a
file
|
git merge [branch name]
|
Merge a branch into
the active branch
|
git merge [source branch] [target branch]
|
Merge a branch into
a target branch
|
git stash
|
Stash changes in a
dirty working directory
|
git stash clear
|
Remove all stashed
entries
|
Sharing & Updating
Projects
Command
|
Description
|
git push origin [branch name]
|
Push a branch to
your
remote repository
|
git push -u origin [branch name]
|
Push changes to
remote repository
(and remember
the branch)
|
git push
|
Push changes to
remote repository
(remembered branch)
|
git push origin --delete [branch name]
|
Delete a remote
branch
|
git pull
|
Update local
repository to the newest commit
|
git pull origin [branch name]
|
Pull changes from
remote repository
|
git remote add origin
ssh://git@github.com/[username]/[repository-name].git
|
Add a remote
repository
|
git remote set-url origin ssh://git@github.com/[username]/[repository-name].git
|
Set a repository's
origin branch to SSH
|
Inspection &
Comparison
Command
|
Description
|
git log
|
View changes
|
git log --summary
|
View changes
(detailed)
|
git diff [source branch] [target branch]
|
Preview changes
before merging
|
In case of any query you can comment below.
Subscribe to:
Comments (Atom)